Monday, October 25, 2010

If the Crown Fits!

I've had the honor of becoming friends with Tiffany Windsor and her sister Heidi Borcher & getting to know a TERRIFIC new product they've just come out with: Cool2Cast. This is a quick setting fiber plaster like material that is specifically used for creating jewelry & home dec accents. After pouring a whole package of the material into molds of all kinds, I finally got around to actually CREATING a piece of jewelry from it! Here's a video on Cool2Cast coloring.


  • Mix Coo2Cast as directed
  • Pour into molds
  • Allow to dry, pop out, allow to dry further
  • Sand back edges with sanding block
  • Stain with alcohol ink & stamp with images (using StazOn permanent ink)
  • Spray with polyurethane to seal
  • Using Smooch metallics: Sugarberry, Gold Lame, and Sassy Pink, accent crown
  • Use Beacon Adhesives, Quick Grip to adhere bail & felt to back
  • Braided cord through bail, attach closure findings
  • WEAR & ENJOY!
While at an all day ART event in Memphis, one of the vendors there was Artistic Outpost! It was nice getting to see Robyn & Shelly again and of course I just HAD to buy several rubber stamp plates! As I looked over all the stamp plates they had, it was hard choosing 3 at least! As I look at any stamps these days, a lot of "thought" goes into it. I have to justified in my mind at least 3-5 ways in which to make these stamps WORK for ME after they are bought. The plates I ended up with were: The Oz Collage, The Wonderland Collage, and The Neverland.

Can you see a story building here? At least three I'll say! These images are awesome and the uses are plentiful. Here is the first use of a phrase used in Alice in Wonderland.....from Artistic Outposts' "The Wonderland" die plate.

Saturday, October 23, 2010

Burlap Tattered Flowers


I was blessed with about $150.00 worth of burlap last week and was determined to make something out of them & quick. Okay, so I only used a tee tiny portion of the burlap I was given but hey, it's just THE beginning!

So the story unfolds:

About 1:30 am I awoke with this great idea to make burlap flower pins! like I did with the denim. But you know how messy & stringy burlap can be! As not to lose the thought, I immediately went outside with the dogs to the trunk of my car where the burlap was still hiden safely from a husband who thinks I have way too much stuff already, where I cut about a 1/2 yard from each color.

Inside I go, dogs in tow. I cut each piece of burlap into 6" x 8" sections, neatly stacking the pieces. It's getting close to 2 am now but the great idea is still there. I get a square plastic bowl & pour some Aleenes Tacky Glue diluted with water. Each burlap 6x8 in piece gets a soak in the mixture. Ball up & wring out excess glue/water mixture. Each wet burlap piece is then placed on parchment paper to prevent sticking. After an hour, the pieces are put in front of a fan (ok, so I was impatient....after all it IS the wee hours of the morning) to finish drying.
The pieces dried fairly quickly but I made SURE the burlap pieces were good & dry. When dry, the burlap is stiff & workable for the project I'm using it for. Using the Tattered Florals from Sizzix, each piece is cut into flower sections. Here's all the flowers I created from the pieces of stiffen burlap.
Then the layering begins. I alternated between the dark brown & tan tattered florals.
Using a Crop-a-Dile, cut a center hole in each flower. Insert a brad or add a pretty button.
And here you have it! My very first burlap Tattered Florals! Ready to wear to church tomorrow!

Friday, October 22, 2010

Recycled Denim

What do you do with those old blue jeans that are a little too snug? Yeah, I know the story cause I have the same one...... that dang dryer SHRUNK them! Sometimes when Goodwill is having their first Saturday of the month HALF off sale, I usually hit them to buy a few nice textures to make "Tattered" flower lapel pins out of.
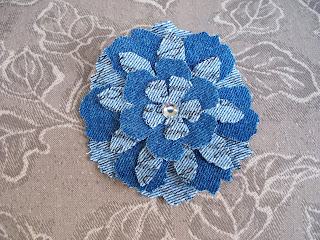


Using the Tattered Flowers die cut by Sizzix's designer, Tim Holtz, cut out two sets of flowers from scrap denim. To get the two different colors of denim, turn every other layer over to the wrong side when stacking. For added interest, stamp wrong side (light side) of denim with a script or stamp of your choosing with StazOn permanent ink. Top it off with a crystal, button, or piece of recycled jewelry. Add your pin back & wha la.....you've got a new fashionable accessory to wear to wow your friends once again!

I'm fixing to attempt this same feat with burlap. I know I'll have to treat the burlap first to keep it from fuzzing off on the person wearing it......plus get it to cut in my Sizzix die cut (Tattered Flowers) out by Tim Holtz without getting stuck in all the wrong places. I became the proud owner of about 150 yards of burlap (dark brown & the usual tan) and I'm dying to see what all I can make out of it! The flower will be my first creation with the burlap. You WILL see lots more designs from burlap, I can assure you!

Hello Punkin


Well, Fall is here & I see pumpkins are all around me! Thus this piece was created.
While in Electica for a club meeting, a class on scratch board was taught. Of course, I didn't leave the store without a little package of the scratch boards in all different sizes. Artistic Outpost images were used on this piece. Here's how this pendant was created.
  • Stamp images with StazOn black ink.
  • Using a Q-tip, color images with StazOn colors, yellow, orange & green, making sure you don't rub hard, DAB your colors on to keep from smearing the black.
  • Using a needle awl or carving tool, scratch your highlights into your scratch board.
  • Go back & fill in some areas if desired with inks (ie. the background here)
  • Add some black trim
  • Drill a small hole for a jump ring (I used a Dremel Drill Press)
  • Lightly spray with sealer
  • Add jump ring & ball chain
  • ENJOY

Thursday, October 21, 2010

Wearable Journal

Roxi Phillips & Candice Windham taught this class at the "Time for Art" event in Memphis and it turned out awesome, as if we expected anything less! This project demonstrated basic metal working skills as well as introduced the class to Ice Resin treated papers. What we ended up with was a beautifully handcrafted wearable journal! This picture doesn't come close to showing you the beauty of this pendant but it's the best I could do.
Candice & Roxi had pre-resined the papers for us to stamp & cut to size. One inch square brass plates were hammered & stamped. Papers cut & stacked to fit neatly inside the brass plates, holes drilled with a Dremel/Dremel Drill Press, jump rings inserted. I used a braided black leather cord, coiled with brass wire, and embellished with small brass sayings/keys. The ends were finished off with end caps & jewelry fasteners.

This necklace is a head turner & show stopper when wearing! I wore it to church & was stopped again & again with people wanting to see what I was wearing!

Thanks Roxi & Candice for teaching this class!!! Loved every minute of it!

Wednesday, October 20, 2010

It's All About the Numbers

It's all about the NUMBERS!

I've always loved creating with numbers & time elements so you can imagine the fun I had with this piece.

If you know me well, you know how I love creating my jewelry pieces symetrical so this necklace kept me challenged to work asymetrical! I love the overall look of this necklace. The pieces for this necklace were collected from all around me. I cut up an ordinary wooden ruler, aging it with Ranger Distress Inks.

Here is a watch face I gutted to make lighter for wearing but glued the numbered faceplate in place. Misc beads were used, heck what's a necklace without beads? The metal numbers were drilled top & bottom to add jumps to string. Vintage silver & antique chains were added for interest.
Here I used small game pieces that I drilled a hole through in order to string. On the ruler is a paper ruler adhered to the wooden ruler section. Using a Crop-a-Dile, I punched my holes & set my eyelets in the ruler for a finished look.

From the ruler section hangs a Vintaq brass plate with vintage bingo game marker glued to it using Beacon Adhesives, Quick Grip. Again, I really like the way this piece turned out. This piece was inspired from a necklace I saw while flipping through a bead magazine & my love for numbers.

Tuesday, October 19, 2010

Card Keeper Envelope Book


At the recent "Taste for Art" the fabulous Barbara Rankin taught this class.

Everyone needs an envelope book to store their cards in before sending out to special friends who need that little lift on those cloudy days.

Notice the tabs on the left side? Each one is labeled so you know where to store those cards for every occasion. The front of the book is stamped using a masking technique to make the woman appear to be out in front of the rulers (stamped upside down on purpose..lol). Each page is inked up using Ranger's Distressed inks & Adirondacks inks which took lots of elbow grease. As of right now only the front side is stamped. I'll get to the other envelopes when I find a spot of time. Just thinking of WHAT I want to stamp on them will take the most time!
Leave a comment on my blog to be entered into a drawing that will take place Tuesday, Oct. 26 to win one of the art pieces being displayed during this week!

Monday, October 18, 2010

Altered Spoon Plaque

I'm always looking for new ways in which to recycle things & this suits the bill very nicely.
This class was taught by Margarite Hardy from River City Stampers.
This beautiful "Fall 2010" plaque was created this past Saturday at the "Taste 4 Art" event held in Memphis, Tennessee. Although the pictures don't do this piece the justice it deserves, I've done my best at it. Now, to tell you how to do it!

Materials:

Beacon Adhesives Quick Grip
black baroque trim
thin piece of wood for the background (or board canvas will do nicely)
black & white acrylic paint
old spoon from thrift store
misc. beads
26 gauge wire to string beads
piece of fabric
clear kitchen/bathroom caulk
piece of muslin
black/brown StazOn permanent ink pad
rubber stamp with favorite saying
piece of scrap wood or foam board
sanding block
hammer & lead piece (letters & numbers optional)
dried leaves
2-3 alcohol inks, colors of your choice
sponges


Directions:
  • paint edges of wood black or brown

  • paint front of scrap wood cut to saying size with white paint

  • spread a thin layer of clear caulk on one side of your board with an old gift card

  • center fabric on board, cut edges flush to board

  • if you're using a scrap piece of wood, sand edges with sanding block

  • paint the front side with white acrylic paint (let dry)

  • stamp muslin with black StazOn ink with favorite saying

  • using clear caulk, spread very thin layer over scrap piece just covered with white paint & center stamped muslin, lightly press down

  • when dried, paint edges black or brown

  • lightly tint the word saying with Ranger's Distress Inks; I used Wild Honey & Vintage Photo
  • working with spoon, hammer flat or leave curved

  • drop small amounts of alcohol randomly on spoon, dabbing with sponge if too much drops

  • wrap spoon with beads on wire

  • using small piece of excess fabric, wrap around spoon, tie & trim ends

  • arrange dried leaves in place
  • trim edges with black baroque trim
When you've decided if your piece is going to hang landscape or portrait, hammer in the hanger on the back of your wood.

Now you're ready to arrange all your pieces & adhere to the fabric background!
Use Beacon Adhesives Quick Grip to adhere all the elements.

Every Fall I go for a nature walk where I pick up the most beautiful leaves to dry! Press them between book pages & leave to dry for several weeks. Store flat in tubs & you'll always have dried flowers/leaves to add to your artwork.

Sunday, October 17, 2010

Drinking Straw Jewelry


Well, I just HAD to try it!

I collected the drinking straws from every cup, washed them, dried them & then cut them up. In a glass jar they went. You have to collect a few to play with and I wanted some different colors to choose from.


At the "Taste for Art" event yesterday, I demo'ed the Drinking Straw Jewelry technique and everyone just couldn't get over what can be done with them.

Another thing I do is collect vintage jewelry from family, friends & of course yard sales. They are then taken apart so the pieces can be used in all kinds of artwork.

The technique I used is as follows:

  • Cut the straws into 2.5 inch pieces.

  • Using 2 non-stick craft sheets, arrange about 4-5 straw section in the colors you choose.

  • Cover with another non-stick craft sheet (sandwiching the straws in the middle).

  • With an iron on the hotest setting, slowly lower iron on the top of the straws being very careful not to let the straws drift apart leaving gaps.

  • You will feel the straw beginning to melt.

  • Once you feel the iron has pretty much flatten the straws (this will only take a few seconds), lift the iron

  • Immediately put something heavy on top of the melted straws to prevent curling

  • After a few minutes, remove & peel the non-stick craft sheets away

  • Cut the straw arrangement into any shape you wish

  • Embellish with wire, beads, and/or vintage jewelry

  • Hook onto a ball chain & fish hook ear wires & you're set to WOW some people!

If you have any questions about this technique, just let me know & I'll be happy to answer you!

Enjoy your newly made jewelry!!!

Thursday, October 14, 2010

TRIPLE PLAY Blog Hop coming soon!

Get ready to have your creative socks blown off! There are 62 designers who are currently very busy creating with new Sizzix die cuts designed by: Eileen Hull, Karen Burniston and Brenda Pinnick! This is a STELLAR event and not to be missed. Click on the Sizzix blinkie & see the days listed in which we ALL will be posting the same die created in many different ways.

Get ready for some FUN!!!!