Showing posts with label burlap. Show all posts

Wednesday, February 12, 2014

Castle Wall Tutorial

Castle Wall


Architectural structures has always been of interest to me. During my travels abroad while others looked at the obvious, I'm looking at the floor tiles, columns, building structure details, etc. When I saw this stencil by Stencil Girl Products, I knew I had to have it. The following is the step by step tutorial how I created this frame-able piece.

Materials

burlap canvas board
Wood Icing
spreader
paint brushes (detail, stipple, large bristle)
A stencil from Stencil Girl Product
water
Glimmer Mist spray (I used copper)
acrylic paints: I used shades three of brown, cream & black
large non-stick mat
paper towels
sanding block

Instructions


Place stencil on burlap canvas board.  Place some Wood Icing on your work surface. 


With your spreader ice your stencil with the Wood Icing being very careful NOT to let your stencil move.


Totally iced canvas. Carefully lift stencil revealing the beautiful design. Place canvas to the side to dry.


Immediately wipe down your stencil on your non-stick mat with paper towels.
This is very important as the Wood Icing drys fairly quickly and will be almost impossible
to removed from your stencil if it's left to dry on it.


Rinse off any existing Wood Icing on the stencil with water. Let dry.


Now wipe your mat off.


When Wood Icing is dry, it's time to paint!  I usually let my pieces dry overnight.


Wood Icing drys very hard. In order to knock off all the jagged edges left when removing the stencil,
use your sanding block & sand vigorously. Dust with large brush to remove all debris.


On your non-stick surface make four puddles of the browns, black and cream paint. To create a blend, I puddle the paint close together and brush on covering the entire surface of the canvas. Castle walls are never just one color but a combination of colors creating an aged appearance. Let dry.


When your Wood Icing is dry, it's got a rough texture. To bring the Castle Wall to life, it's time to sand the surface of the canvas. Use a little elbow grease to remove the paint from the surface of the Wood Icing.


When done sanding it's time to get the dust out of nooks & crannies.
Brush vigorously to remove the Wood Icing dust from the canvas.


The castle wall didn't pop enough so some detailed shading using
black paint and a detailing brush did the trick.


Shading done.


I love adding a subtle glimmer so using your Glimmer Mist, spray the entire canvas.
Go lightly with the spray, it won't take much. When wet it's hard to see the result you want.


Blot lightly with a paper towel to remove any excess puddles of Glimmer Mist.


I get impatient so out comes my heat tool. In no time, it's dry.


A close up of the subtle glimmer.

I feel the canvas is begging for something else....but it's not coming to me at the moment. I'll open frame it so the detail is not lost behind glass. I'm loving the way this piece has gone from burlap canvas to a wall you can feel the texture come off the canvas. The burlap added that extra POP of textile I was seeking. If you get a chance to play with Wood Icing, you'll have the time of your life creating!

Monday, April 9, 2012

Burlap Roses


Tonight's project for the Artistic Stampers of Jackson was learning how to make Burlap Roses. I taught a full class and each artist had their roses pinned to their shirts/jackets before they left the building!

I had prepped the burlap before the meeting by soaking 5" wide strips of burlap in white craft glue diluted with water; squeezed out; hung up to dry.

Brought my Big Shot and the Sizzix's die Layered Flowers #5
Westcott Scissors
Hot glue gun

3 large flowers cut from the die on the Big Shot machine
Each cut according to pattern provided in class, glue layers, curl rose petals, add a pin back and each artist wore their Burlap Roses home!

Just love it when a class goes this smooth!

Saturday, October 23, 2010

Burlap Tattered Flowers


I was blessed with about $150.00 worth of burlap last week and was determined to make something out of them & quick. Okay, so I only used a tee tiny portion of the burlap I was given but hey, it's just THE beginning!

So the story unfolds:

About 1:30 am I awoke with this great idea to make burlap flower pins! like I did with the denim. But you know how messy & stringy burlap can be! As not to lose the thought, I immediately went outside with the dogs to the trunk of my car where the burlap was still hiden safely from a husband who thinks I have way too much stuff already, where I cut about a 1/2 yard from each color.

Inside I go, dogs in tow. I cut each piece of burlap into 6" x 8" sections, neatly stacking the pieces. It's getting close to 2 am now but the great idea is still there. I get a square plastic bowl & pour some Aleenes Tacky Glue diluted with water. Each burlap 6x8 in piece gets a soak in the mixture. Ball up & wring out excess glue/water mixture. Each wet burlap piece is then placed on parchment paper to prevent sticking. After an hour, the pieces are put in front of a fan (ok, so I was impatient....after all it IS the wee hours of the morning) to finish drying.
The pieces dried fairly quickly but I made SURE the burlap pieces were good & dry. When dry, the burlap is stiff & workable for the project I'm using it for. Using the Tattered Florals from Sizzix, each piece is cut into flower sections. Here's all the flowers I created from the pieces of stiffen burlap.
Then the layering begins. I alternated between the dark brown & tan tattered florals.
Using a Crop-a-Dile, cut a center hole in each flower. Insert a brad or add a pretty button.
And here you have it! My very first burlap Tattered Florals! Ready to wear to church tomorrow!

Friday, October 22, 2010

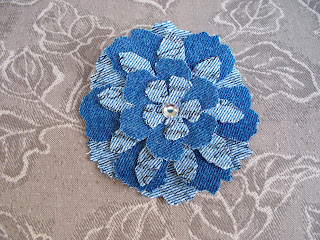
Recycled Denim

What do you do with those old blue jeans that are a little too snug? Yeah, I know the story cause I have the same one...... that dang dryer SHRUNK them! Sometimes when Goodwill is having their first Saturday of the month HALF off sale, I usually hit them to buy a few nice textures to make "Tattered" flower lapel pins out of.


Using the Tattered Flowers die cut by Sizzix's designer, Tim Holtz, cut out two sets of flowers from scrap denim. To get the two different colors of denim, turn every other layer over to the wrong side when stacking. For added interest, stamp wrong side (light side) of denim with a script or stamp of your choosing with StazOn permanent ink. Top it off with a crystal, button, or piece of recycled jewelry. Add your pin back & wha la.....you've got a new fashionable accessory to wear to wow your friends once again!

I'm fixing to attempt this same feat with burlap. I know I'll have to treat the burlap first to keep it from fuzzing off on the person wearing it......plus get it to cut in my Sizzix die cut (Tattered Flowers) out by Tim Holtz without getting stuck in all the wrong places. I became the proud owner of about 150 yards of burlap (dark brown & the usual tan) and I'm dying to see what all I can make out of it! The flower will be my first creation with the burlap. You WILL see lots more designs from burlap, I can assure you!