Showing posts with label Ranger. Show all posts

Thursday, February 2, 2012

All in a Name!

I can't express enough how much I LOVE Duetica's fonts! I was playing with my last name & came up with this beautiful piece. The pictures below don't show just how beautiful this piece is! The Woodwynds font is used in this piece. The delicate swirls & dots just gave me so much room to play with in making this a prized piece to hang up on the entrance hallway so all can see.

On Kraft colored cardstock, I printed out the whole name in different sizes all over the page in a light gray. Then right smack in the center I placed the letter G, big & bold. Although you can read the last name in the background, the letter G is what is most eye catching!


On the centered G, a thick layer of crackle paint was generously spread. Let dry throughly on it's own to give the crackling ingredient time to do it's job. Here (dried) you can see the actual crackling effect! Very detailed!


The thicker swirls in the Woodwynds font gave me the perfect opportunity to use distressed glitter glue. I know, distressed glitter just goes against all grains! This worked nicely against the Kraft colored cardstock. It was thicker but not overpowering. When dried, I added some foam metal dots where the Woodwynds font dots were. Striking! I just love adding metal in my artwork! Gives it the POP I was looking for.
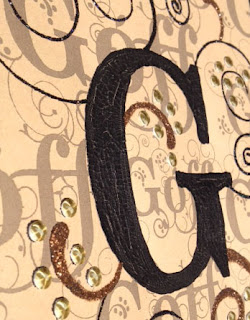


Another view of the G. I didn't want the black swirls to overpower the piece so I used a black diamond glitter glue to all the thin lines coming off the main G. This adds a wonderful sparkle to the piece. Now, cut the piece down to a 8x10 and it's now ready for framing!


No matter how I angled this frame, I kept getting reflections off the wood or glass. But it does show the whole end effect. When it gets hung on the wall, perhaps that will give me a better picture.


If you've not tried Duetica Lettering Arts Studio, you should! It's an awesome new twist in lettering!


Supplies Used


Duetica Lettering Arts Studio
Microsoft Publisher
Stickles: Black Diamond
Ranger: Distressed Vintage Paper

Gold Metal Dots with foam adhesive

Ranger: Black Crackle Paint

Friday, February 18, 2011

Alexa's Jewelry Designs!

Tonight I have the pleasure of having my niece's little/big girl for a night full of creating.

Alexa is 8.5 years old but already she is a NATURAL at designing her jewelry. After I picked her up at school, we headed to Hobby Lobby. There I had her pick out 2 sets of beads she'd like to make into earrings. The decision was tough as the sparkly beads all hung there as if candy ripe for the taking. After careful thought, Alexa picked out the two she loved best.
Green Panda glass lampwork beads were an immediate selection......
After showing her how to load a headpin (YES, she knows the difference between a headpin & an eyepin now) she laid out her beads on a beading mat. After moving the beads around she found a design that pleased her. Headpins were loaded.....all I did was cut & form the loop so she could string on her necklace chain/cord. What are earrings without having a necklace to match?
The second design was a tad harder. She had to pay attention to the glass bead formations to make sure each were the same & would match when she put them on.

We also worked on a bracelet but the Glossy Accent by Ranger hasn't hardened yet so it will be tomorrow before it's picture is taken. Alexa chose a beachy theme for that one....

Alexa is a natural at jewelry designing! I see a future in it for her. Tonight after supper, we'll work on a flower bottle cap complete with magnet so she can wear it with a necklace I presented to her earlier this past year.

It is super FUN creating with Alexa!! She can't wait to show her designs off to her mama in the morning!

Tuesday, September 1, 2009

Shellz

Sample of recycling!

This set was made with black polymer clay that was molded into the bezels. Two dear friends gave me some natural colored egg shells to play with.....of course I turned mine into jewelry! Breaking the egg shells in tiny pieces I used tweezers to place the shells where I wanted them. This actually was time consuming. When I was pleased with the placement of the tiny shell pieces, I heated my toaster oven to 275 & baked the clay in the bezels for approx. 15 minutes. After the pieces cooled down, I poured some glossy accents on the top to protect the clay & the shells and add a really wonderful shine.


The necklace & earrings were bought at a thrift store. I removed the plastic pieces from the bezels to provide a nice place to create the Shellz jewelry shown here.


Enjoy...........